the lights have been hung, and are functional. when i actually start using them (which will be when the clones start to flower), i will buy a new timer, just for them.
i REALLY need to correctly re-wire the whole thing. it is currently the end of a really long extension cord that is plugged into an outdoor GFI next to the deck. it really needs to be on its own circut, and i need to add another 4 outlets OUTSIDE the grow-roomNURSERY, for plugging in weed-whacker batteries and suchlike.
i started collecting things on my list of stuff to take to OCF. it took a lot less time than i thought it would to get most of the stuff on the list.
(include building a leg for the remainder of the shelves using recycled wood from the demolition project, in preparation to re-cover them with something more durable than pressboard.)
this is done, and re-covering the shelves is done, and moving the stuff that used to be on the old shelves back onto the new shelves is also done… and moving all of the tools back into their proper places, and loading up all the construction debris in preparation for taking it to the dump, has also been accomplished. 😎 i still have to hang the lights in the main part of the room (the light is already hung in the light-proof booth), but that requires two people. it would be getting done today, with the help of moe, except…
except that moe has decided that today is the day she has to drive to salem, oregon and trade in her old (it’s a 2019) car for a new, bigger, hybrid. 🙄 she left this morning at around 08:00 and should be home… sometime later today… but it’s already 15:00 and she’s still in salem, which means that “sometime later today” could, in reality, mean sometime in the early hours of tomorrow will be around 20:00 (FindMy and iMessage to the rescue!!! 🤓)
three clones haven’t died yet, but it’s only been five days. they’re all ACTING like they are rooting, but i won’t actually know until they start sprouting new growth, and they haven’t done that yet.
and, speaking of going to oregon, OCF is a little more than a week away, and i have done absolutely ZERO preparation for it, which strikes me as a little odd.
step one: clear out the back end of the shed, and demolish the pressboard shelves.
step two: build a wall, approximately four and a half feet from the back end wall of the shed (materials already purchased).(include building a leg for the remainder of the shelves using recycled wood from the demolition project, in preparation to re-cover them (later, different project) with something more durable than pressboard.) — LATER!
step three: add a, preferably, left-hand, outswing door.
step four: add a ceiling. (materials already purchased)
step five: add insulation on the walls and ceiling, preparing for step six in the process. then add reflective mylar sheeting over the insulation.
step six: add existing grow lights.
hanging the lights has yet to be done — hanging the lights requires two people: one on the inside, and one on the outside — and the doorknob has yet to be installed, but the door closes, in spite of the fact that it swelled up with moisture during the past few days of rain, thanks to my next-door neighbour, tracy, who showed me a nifty trick that involved removing shims and hammering the frame, so that i don’t have to take the door off its hinges and plane or sand it. 250624 – Fyodor Karamazov and didjeridui’ve moved the light-booth in, and created three clones, yesterday, which are already starting to perk up after being cloned. the plan is to have vegetative lights in the light-proof booth, and flowering lights in the main room, where there’s more room.
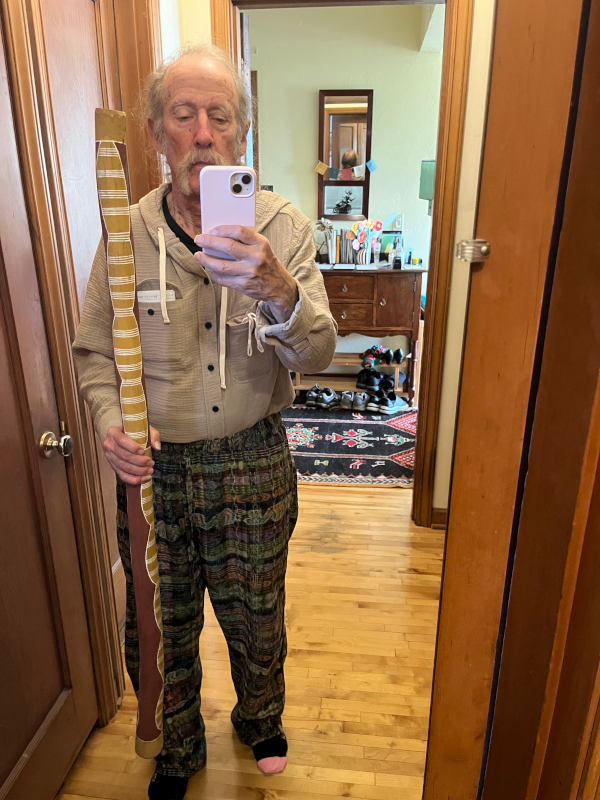
in other news, my friend tim furst (who is also known as Fyodor Karamazov, one of the original Flying Karamazov Brothers) gifted me an authentic, hand-made, aboriginal didjeridu, from Kuranda, Queensland, Australia, made in 1986. he said, and i quote: “I’d like to put it in the hands of someone who will play it.”
i am honoured to be the recipient of such a gift, and i will, in fact, play THE HELL out of it! 😉👍👍
today is “officially” the first day of SACBO, but, because of the fact that it’s a caravan, interspersed with parties with people i, for the most part, don’t know, and places to view strange art (among other things, a “beaded fighter jet”??), i will not actually show up until tomorrow.
today i hope to finish the preparation for the grow room (hanging the mylar and the lights), and take clones from the most vigorous plant.
i have been elected to play the glockenspiel in the panto, this year, because kiki is “indisposed” (i.e. she will be on stage when the glockenspiel is supposed to be played). i actually HAVE a glockenspiel, one that i got off of freecycle, a few years ago, and i went out and bought a new pair of brass bell mallets, because now i have an excuse. 😉 however, it has one note, the middle A, which, instead of going “DING“, goes “DINK“… 😖 it has EXACTLY the same mechanisms holding it in place that the other keys do, and i have actually taken the key completely off the instrument, and inspected it closely for anything that might make a difference in the tone, but to no avail. i talked to the guy who works at lars’ old shop, who says he has never worked on a glockenspiel before, and i’m thinking of taking it to ted brown music and seeing if any of their repair technicians have any clues… otherwise the glockenspiel melody will go DING DING DING DING DINK DING DING DING DINK which, while somewhat amusing, is NOT appropriate for a panto.
step one: clear out the back end of the shed, and demolish the pressboard shelves.
step two: build a wall, approximately four and a half feet from the back end wall of the shed (materials already purchased).(include building a leg for the remainder of the shelves using recycled wood from the demolition project, in preparation to re-cover them (later, different project) with something more durable than pressboard.) — LATER!
step three: add a, preferably, left-hand, outswing door.
step four: add a ceiling. (materials already purchased)
step five: add insulation on the walls and ceiling, preparing for step six in the process. then add reflective mylar sheeting over the insulation.
the insulation is complete, and i had less than 2 feet of leftover, which is good. the only steps left are the mylar and the lights! 👍👍
which is a good thing, because i’m going to start needing a place with vegetative light to start my clones, in four days! 😱
step one: clear out the back end of the shed, and demolish the pressboard shelves.
step two: build a wall, approximately four and a half feet from the back end wall of the shed (materials already purchased).(include building a leg for the remainder of the shelves using recycled wood from the demolition project, in preparation to re-cover them (later, different project) with something more durable than pressboard.) — LATER!
step three: add a, preferably, left-hand, outswing door.
step four: add a ceiling. (materials already purchased)
step five: add insulation on the walls and ceiling, preparing for step six in the process. then add reflective mylar sheeting over the insulation.
i need two more rolls of insulation, because i bought what they had, which was R15 insulation, which comes in shorter rolls than the R13 insulation that i originally wanted… R15 insulation is better than R13, but because of the fact that it comes in shorter rolls, there wasn’t enough of it, so tomorrow i will buy more insulation… and a pair of shears to subdivide it, because the studs are not standard widths apart, and that’s about 85% of what is left, at this point… 😒
step one: clear out the back end of the shed, and demolish the pressboard shelves.
step two: build a wall, approximately four and a half feet from the back end wall of the shed (materials already purchased).(include building a leg for the remainder of the shelves using recycled wood from the demolition project, in preparation to re-cover them (later, different project) with something more durable than pressboard.) — LATER!
step three: add a, preferably, left-hand, outswing door.
step four: add a ceiling. (materials already purchased)
the wall is complete! the door is complete, and it WORKS (thanks to my next-door neighbour, tracy, who does this sort of thing because he finds it relaxing)!! the only things left, at this point, are installing the insulation and the mylar (materials have been bought and delivered), and hanging the lights (all of which i can do myself). eventually, at some point, we’re going to have to re-do the electrical service to the shed, because it is currently an extension cord, buried under the turf of the back yard, and plugged into a GFI on the back deck — goddamn ron zeising! 🤬 — and i had to move the outlet in the shed, because a big FUCKING extension cord is NOT the correct way to wire an outbuilding! 😒
step five: add insulation on the walls and ceiling, preparing for step six in the process. then add reflective mylar sheeting over the insulation.
step one: clear out the back end of the shed, and demolish the pressboard shelves.
step two: build a wall, approximately four and a half feet from the back end wall of the shed (materials already purchased). include building a leg for the remainder of the shelves using recycled wood from the demolition project, in preparation to re-cover them (later, different project) with something more durable than pressboard.
step three: add a, preferably, left-hand, outswing door.
half of the wall is complete, and we have dry-fitted the door, which i had to cut down, because an 80-inch door is too tall… and we’re going to have to shim THE HELL out of the door, because the whole shed is so un-square that the door will not function without significant shimming. and it turns out that moe has a whole bunch of leftover doorknobs from the remodeling project at the clinic, so my un-square light room is going to get an official veterinary hospital doorknob. which is a lot better than the total lack of doorknob that i was going to go with. 😉
the rest of the wall is going to wait until the door is in place, so we will only have to cut and place once. i bought the insulation, and the mylar is ALLEGEDLY being delivered tomorrow, but i’ll believe it when i see it.
major thanks to my next door neighbour, tracy, who loaned me a circular saw that actually cuts straight and isn’t falling apart. 😉
step four: add a ceiling. (materials already purchased)
step five: add insulation on the walls and ceiling, preparing for step six in the process. then add reflective mylar sheeting over the insulation.
step one: clear out the back end of the shed, and demolish the pressboard shelves.
step two: build a wall, approximately four and a half feet from the back end wall of the shed (materials already purchased). include building a leg for the remainder of the shelves using recycled wood from the demolition project, in preparation to re-cover them (later, different project) with something more durable than pressboard.
step three: add a, preferably, left-hand, outswing door.
step four: add a ceiling. (materials already purchased)
the framing for the wall is complete, and i have added a ceiling (which was easier than waiting until the wall and the door are there), so this is already out of order, but it’s a lot easier that way. i just ordered 200 feet of agricultural mylar, and i’m going out to buy a door, and the insulation tomorrow.
and i discovered that the shed is not only not square, it is not parallelepiped-shaped, either. it was OBVIOUSLY originally built by someone who DOES! NOT! CARE!, which i find particularly annoying because it was, literally, HIS JOB to care about such things. 😒
step five: add insulation on the walls and ceiling, preparing for step six in the process. then add reflective mylar sheeting over the insulation.
step one: clear out the back end of the shed, and demolish the pressboard shelves.
step two: build a wall, approximately four and a half feet from the back end wall of the shed (materials already purchased). include building a leg for the remainder of the shelves using recycled wood from the demolition project, in preparation to re-cover them (later, different project) with something more durable than pressboard.
the framing for the wall is mostly done: i still have to put in the studs, but everything else is firmed up, secure, and a good deal stronger than it was before… and i found out that, on one side of the shed, the studs are 23 inches apart, and on the opposite side of the shed, the studs are 20 inches apart, so the room i’m building is NOT square. 😒🙄😖
probably finish the wall and ceiling this weekend. possibly the door, as well.
step three: add a, preferably, left-hand, outswing door.
step four: add a ceiling. (materials already purchased)
step five: add insulation on the walls and ceiling, preparing for step six in the process. then add reflective mylar sheeting over the insulation.
according to lucifer (who i talked to on the phone, yesterday), she left in the morning, and when she came back in the afternoon, he was dead. she said he had an electrical plug in his hand, and it’s probable that he bent over to plug something in, and had a heart attack.
at least he didn’t shoot himself, like he was fantasizing about doing in a text to thaddeus, earlier in the week (and who could blame him)…
120815 salamandir and hobbit190828 salamandir & hobbit at the Oregon State Fair
step one: clear out the back end of the shed, and demolish the pressboard shelves.
step two: build a wall, approximately four and a half feet from the back end wall of the shed (materials already purchased). include building a leg for the remainder of the shelves using recycled wood from the demolition project, in preparation to re-cover them (later, different project) with something more durable than pressboard.
step three: add a, preferably, left-hand, outswing door.
step four: add a ceiling. (materials already purchased)
step five: add insulation on the walls and ceiling, preparing for step six in the process. then add reflective mylar sheeting over the insulation.
step six: add existing grow lights.
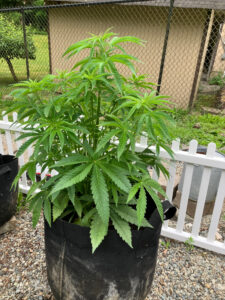
THE END RESULT: an insulated grow room that i can use year round… which is going to start with clones from the space queen seeds that i had left over from last year, because they are REALLY vigorous, and this is an excellent opportunity, which is going to end once the solstice happens, because the light changes, and the decreasing daylight will trigger flowering, and once that happens i won’t be able to clone them any longer. 😉
250604 very vigorous space queen
the former owner of this house put in brand new pressboard shelves in the shed, just prior to selling the house. the shelves SORT OF worked for the first few years, but they quickly developed major sagging, because they are pressboard. the plan, eventually, is to build more shelves out of stronger, less likely to sag, materials — seriously, i would have thought that a general contractor, as ron zeising was reputed to be, would have known that pressboard is definitely NOT the material to use for shelves, but oh well, whatever… i already know that ron zeising put absolutely no critical effort into the projects that he did, so what did i expect? 😒🙄
There was a reason for President Donald Trump’s particularly scathing response when a reporter asked him Wednesday about a new term coined about the president’s tariffs: TACO, or Trump Always Chickens Out. He had not yet heard the term, according to a senior White House official who acknowledged to CNN that the president was caught off guard. Trump had said as much at the time, saying “I’ve never heard that”…
— May 30, 2025, CNN
250601 four past presidents, bush, clinton, obama, and biden, all wearing T-shirts that say “LET’S GO TACO”, eating tacos
can i just say a big, strong, 🙄 over a “president” who says “i’ve never heard that” in response to a meme about him?